Photo Accessories

5 products that caught my eye at Photokina 2016

I have just returned from a bustling two days at Photokina, the biannual photographic gear lovefest that is held in Cologne, Germany. I was travelling in the exquisite company of fellow Belgian X-photographers Isabel Corthier and Ioannis Tsouloulis. I want to thank the people from Fujifilm Japan and Belgium for inviting us over. Trade shows like Photokina are as much about people as they are about products. So, it was great to reconnect with longtime friends such as Tom, Bert (who used Tom’s bald head as a reflector during his 'Small lights, big results’ demo on the Fujifilm stand), Rob, Damien (energetic as ever), the German ‘rock star’ trio Dieter, Jens & Peter and Marco, Julia, Shusuke and Kunio. I also had the privilige of being introduced to new people such as Patrick La Roque, Jens Krauer, Martin Hülle and their impressive work. Finally, I am happy I got to meet Rico Pfirstinger. He’s the author of the unofficial Fujifilm manuals. If you are struggling to get the most out of your camera, his books and workshops are among the best resources to turn to.

Now of course, apart from the social aspect, Photokina is obviously also about gear. Lots of gear! In fact, it's probably the most GAS (Gear Acquisition Syndrome)-inducing show on the planet. Even during those two days, I was unable to visit each hall, let alone each booth. Yet, there were a couple of products that caught my eye. Because the Internet loves lists, here's five of them, in no particular order. Well, except maybe for the first! 

1. Fujifilm GFX

The GFX looks like a beefed-up X-T2. Image © Fujifilm.

The GFX looks like a beefed-up X-T2. Image © Fujifilm.

Call me biased (I'm an X-photographer after all) but the Fujifilm GFX was the star of the Fujifilm booth and probably even of the entire Photokina. In case you've just returned from another planet, the GFX 50s is Fujifilm's first digital medium format camera. It has a sensor size roughly 4 times that of the other X series cameras and a pixel count of 51.4 megapixel. The GFX 50s will be available with three lenses at launch, which you should be ‘early 2017’. By end of 2017, another tree lenses should be available.

Literally everybody wanted to get their hands on the camera of which only a couple of prototypes exist. I was lucky enough to get to hold it in my hands for a couple of minutes. I was surprised at how well it focused even in the dark venue where I was and also at how lightweight it was: this beast of a camera weighs less than many a professional DSLR! If you want to read more about the specs (even more than is available on Fujifilm's own website) read this excellent article by Rico Pfirstinger.

The price of the GFX hasn't been set yet, but Fujifilm management did promise it would be 'well under $10.000' with the standard lens. We have yet to see into how many Euro that will translate...

Official press release here.

You'll be able to use two EVF viewfinders with the GFX: a regular one and one that can be tilted and rotated, allowing almost every imaginable capture angle. It will even be possible to use an external monitor.

You'll be able to use two EVF viewfinders with the GFX: a regular one and one that can be tilted and rotated, allowing almost every imaginable capture angle. It will even be possible to use an external monitor.

2. Phottix Spartan beauty dish

As you know, I use a lot of artificial (flash) lighting in my images, so I'm always eager to learn about cool new lighting accessories. One interesting modifier I came across was at the stand of Phottix. The Spartan beauty dish (full specs here) is a modifier that seems to come straight out of a Transformers movie: it's easy to set up and you can remove the disc in the center to turn it into an octabox. I also like the fact that it comes with a grid. More and more, I seem to be using grids in my own lighting. The Spartan comes in two sizes: 50 cm and 70 cm. Price for the latter is about $145. That is very affordable, considering that some companies charge about that much for just a grid!

3. SMDV BRiHT-360

The SMDV BRiHT-360 is a lightweight 360 Ws battery-powered barebulb flash with removable battery that slides into the main unit.

The SMDV BRiHT-360 is a lightweight 360 Ws battery-powered barebulb flash with removable battery that slides into the main unit.

Just as I thought I could finally finish the manuscript of the second edition of my Making Light e-book, I came across the SMDV stand... I could not help but notice their BRiHT-360 portable barebulb flashes (there were about 10 of them placed along the counter). As you may know from previous blog posts, I am a fan of their easy to set up (and even easier to break down) Speedbox series of softboxes. At Photokina, it was the BRiHT-360 that stole the show, though. As its name implies, this is a 360 Ws barebulb flash. What I like about it is that it's super lightweight at only 1.25 kg including the battery. The latter lasts about 300 full power pops. Basically, this thing produces the same amount of light as four Speedlights at the weight and price of only two. What I also like, is that it works well with SMDV's Speedboxes, who happen to be also very lightweight: the combination of the BRiHT and an 85 cm Speedbox only puts 2 kgs on the scale!

The BRiHT does TTL and HSS with Canon and Nikon cameras (using a compatible SMDV Flashwave 5 trigger) but luckily enough it also works in manual mode on my Fujifilm cameras. I am looking forward to testing this unit more in-depth and to see whether I might even be able to get some sort of HSS with my Fuji cameras by using the Cactus V6 Mark II triggers, which I reviewed here.

In the mean time, you can read the full specs of the BRiHT 360 here. In Europe, the BRiHT will be available through www.foto-morgen.de. Price should be somewhere around €700 / $750.

4. Godox

The AD600 exists in a Bowens and a Godox mount and in a TTL and manual version. All versions support HSS with Canon, Nikon and Sony (provided you use the matching Godox X1 trigger). Image © Godox.

The AD600 exists in a Bowens and a Godox mount and in a TTL and manual version. All versions support HSS with Canon, Nikon and Sony (provided you use the matching Godox X1 trigger). Image © Godox.

Godox, whose Lithium battery-powered Ving V850 speedlight I’ve reviewed here, also had a stand at Photokina. Their AD600B battery powered studio flash has recently been reviewed in Shoot, the Belgian photography magazine I write for (Dutch link here). This unit packs 600 Ws of power in an affordable package with TTL and HSS support for Nikon, Canon and Sony. By default, it comes as an all-in one light with a battery that attaches directly to the body of the flash. The advantage is that you don’t need cables and you don’t have a separate power pack to worry about (or carry around).

The potential disadvantage is that if you put your light on a boom stand, especially with a heavy modifier, the setup can get a bit top-heavy. Also, if you’re using an assistant instead of a light stand, it’s quite a workout to hold a setup like this in the air for any prolonged period of time.

Image © Godox

Image © Godox

So I was happy to see the 600 Ws Extension Head. This accessory allows you to separate the pack from the head. Just unplug the flash tube from the AD600, plug it in the Extension Head, connect the power cable to where the flash tube used to be and boom, you've transformed your all-in-one into a pack-and-head system.

Godox also had a 1200 Ws Extension Head on display: this accessory has a special, more powerful flash tube which effectively allows you to turn 2 AD600s into one 1200 Ws pack-and-head system. With so much power, you can overpower the sun even when using larger modifiers. Or, you can benefit from faster recycle times.

Finally, Godox also had an AC adaper on display which allows you to turn the AD600 into a mains-powered flash. The adapter includes a fan as well.

If you live in the US, note that the AD600 is sold by Adorama under the Flashpoint XPLOR 600 brand name.

Image © Adorama

Image © Adorama

The 600 Ws Extension Head ships without a flash tube because you use the one that comes with the AD600. Price is around $80. Image © Adorama.

The 600 Ws Extension Head ships without a flash tube because you use the one that comes with the AD600. Price is around $80. Image © Adorama.

The 1200 Ws one has a special flash tube which actually consists of two 600 Ws tubes. Price is around $300. Image © Adorama.

The 1200 Ws one has a special flash tube which actually consists of two 600 Ws tubes. Price is around $300. Image © Adorama.

5. 3 Legged Thing Albert Tripod

I have been using the Three Legged Thing Brian tripod during my travels for the last couple of years. The main reason is that it is a lightweight travel tripod that still can be extended really high. For me, it serves a dual purpose: I can use it as a traditional tripod for long exposure photography (in which case I obviously don't extend it all the way up) but I actually use it a lot more as an impromptu light stand. Having this versatility (transformability really seems to be a theme in the products I selected in this blog post) allows me to travel with less weight without compromising on photographic opportunities. Alas, the Brian is no longer available. At Photokina, I was introduced to his successor: Albert. The Albert was improved on a number of points but still shares the Brian’s adventurous and multi-purpose DNA. Price of this carbon-fibre travel tripod system is about GBP 400 (including a ballhead).

Full specs here.

The Brian used as a light stand.

The Brian used as a light stand.

So there you have it, a quick round-up of some of some of the products that caught my attention at Photokina. If you were there, I’d love to hear what caught yours!


The Fujifilm Accessory Holiday Gift Guide

Yes, it’s the time of gift guide blog posts. So I thought I’d chime in and give you some gift ideas especially for those loved ones that use Fujifilm cameras, although some of these gifts are perfectly compatible with other camera brands. I’ve listed them by increasing price. I'm also assuming that your loved ones already have their share of X-cameras and lenses. Otherwise, these would be my first suggestion, obviously!

1. A remote control for the X-T1

This year, I've discovered the world of long-exposure photography (I know, I'm late to the party but better late than never, right?) Until last year, a long exposure for me was something like one third of a second! If you're doing a 4 minute exposure, you don't want to keep the shutter button depressed for all that time. That's where a remote like this affordable Neewer (Amazon link) comes in. It's actually marketed for Canon cameras, but it has the same plug as the X-T1's microphone jack, which does double duty as the remote control jack. This cheap and handy remote not only lets you do bulb exposures, you can also set it up for interval shooting or specify a delay. 

Although marketed to Canon users, this remote works perfectly with my X-T1.

Although marketed to Canon users, this remote works perfectly with my X-T1.

This remote helped me to capture this 240 second exposure. Shot with the X-T1 and my favourite lens: the 10-24 mm.

This remote helped me to capture this 240 second exposure. Shot with the X-T1 and my favourite lens: the 10-24 mm.

Price: $18.99


2. The Fujifilm X-T1, 111 X-Pert Tips to Get the Most Out of Your Camera

The X-T 1 is a fantastic camera. It's also getting more complex with every firmware update. This guide by Fuji expert Rico Pfirstinger helps you to unlock its full potential. It’s filled with tips you don’t find in the manual. For a limited time, code XT1240 gives you 40 percent off. Rico also wrote a similar book for the X-T10, available here. Until the end of the year, code FUJIRUMORSXT10 gives 30 percent off. Finally, there's also a book, Mastering the X100s and X100T. It's written by Peter Fauland and is available here.

Price: $24,95


3. A Lastolite Trifold umbrella

At $25, this is an unmissable accessory for anyone who's starting out with off-camera flash photography, whether it is on the Fujifilm system or on any other system. This lightweight umbrella folds down so compactly, you have no excuse not to put it in your camera bag or backpack. It will tremendously improve the quality of your off-camera flash light. The bigger the light source, the softer the shadows! One word of caution, though: because of its folding mechanism, this umbrella does not fit in every umbrella adapter.

The Trifold in action, used with 2 Godox Ving V850 flashes on a Lastolite Exybox II dual flash bracket.

The Trifold in action, used with 2 Godox Ving V850 flashes on a Lastolite Exybox II dual flash bracket.

Price: $24.95 (B&H link | Amazon UK link)


4. My Lightroom preset bundle

One of the joys of the Fujifilm raw files is that they allow for a lot of leeway in post-processing. Although there are some raw converters that manage to squeeze more sharpness out of a Fujifilm raw file, Adobe Lightroom is still my go-to software. I've created two preset bundles, one for Black and White and one for color grading. When you buy them over at Craft & Vision as a bundle, you get a 25 percent discount. By the way, Craft & Vision has gift cards, too!

The presets come with a detailed PDF manual that explains how to install and use them. By the way, the cover image was shot with the excellent 56 mm 1.2, one of my favourite Fujifilm lenses.

The presets come with a detailed PDF manual that explains how to install and use them. By the way, the cover image was shot with the excellent 56 mm 1.2, one of my favourite Fujifilm lenses.

The Colour Grading presets are aimed to give your images a truly cinematic feel. This image was shot with the Fujifilm 55-200 mm. A lightweight yet versatile and high-quality travel zoom.

The Colour Grading presets are aimed to give your images a truly cinematic feel. This image was shot with the Fujifilm 55-200 mm. A lightweight yet versatile and high-quality travel zoom.

Price: $20 + VAT per set, $30 for the bundle of both.

From dusk to dawn with the click of a single button. That's the power of Lightroom presets for you!

From dusk to dawn with the click of a single button. That's the power of Lightroom presets for you!


5. Adobe Lightroom

To me, Lightroom is still the best all-round raw converter available and it also lets you manage your photos, share them, print them, publish them in a website or print them in a photo album. That makes Lightroom a great gift for any photographer who does not yet use it.

Don't you just love Fujifilm's fast prime lenses? Even at ISO 4000, an aperture of 1.4 and a shutter speed of 1/25th, this image shot inside a Buddhist monastery was still incredibly dark. After adding an extra stop and a half of Exposure in Li…

Don't you just love Fujifilm's fast prime lenses? Even at ISO 4000, an aperture of 1.4 and a shutter speed of 1/25th, this image shot inside a Buddhist monastery was still incredibly dark. After adding an extra stop and a half of Exposure in Lightroom and tweaking the Detail panel sliders a little, I got this perfectly printable image.

Price: there are two versions of Lightroom: the perpetual license costs around $129 ($89 for an upgrade from a previous version) but the better deal in my opinion is the Lightroom + Photoshop subscription, where $10/€10 per month (billable annually) + VAT or Tax gives you one year access to both Lightroom and Photoshop. 


6. The gift that keeps on giving: The Fujfilm Instax Printer

I’ve started giving out instant prints to the people I photographed along my journeys as early as 2009. At the time, I used a Polaroid Pogo. Handing out prints allowed me to not only take a photo but give something back in return. And by doing it on the spot rather than on my return back home, it saved me the trouble of trying to decrypt hastily written addresses or trying to remember which photo I should send to which person. But what I hadn’t expected at first, was that handing out prints to people was also the perfect door-opener to photograph… even more people. More than once have I had the experience that someone did not want to have their photo taken, only to ask me to take their photo just minutes later after they had seen me give a print to someone else.

My buddy and co-workshop leader Matt Brandon with the Fujifilm Instax Printer. Read his review about the printer here.

My buddy and co-workshop leader Matt Brandon with the Fujifilm Instax Printer. Read his review about the printer here.

The Pogo did have its disadvantages, though: the battery lasted for only 10 shots and color fidelity was clearly not high on the specs list. So for a moment I dabbled with the idea of bringing a Fujifilm Instax camera, but then Fujifilm announced the Instax Share SP-1 Printer. If you get only one of the accessories that I have listed in this overview, make it that little printer. Especially in remote areas where people don’t have ready access to photography, you’ll spread joy with every Instax print you hand out. And, as a sign of good Karma, you’ll be rewarded with more great photo opportunities, too. And you don’t have to take my word for it: check out the praise of Matt Brandon or Zack Arias in their reviews of the SP-1.

Price: $179 (B&H link) | GBP 124.99 (Amazon UK link) | 149 € (Grobet)

The Instax Printer helps to break the ice and is a great way to give something back to the people you photograph.

The Instax Printer helps to break the ice and is a great way to give something back to the people you photograph.

The Instax printer. Instax prints, instant fiends.

The Instax printer. Instax prints, instant fiends.


7. Nissin i40 Flash (Fujifilm version)

The i40 is the perfect mid-size, mid-power companion for the Fujifilm X-cameras. Not as powerful as, say a Godox V850, but also a lot smaller and lighter.

The i40 is the perfect mid-size, mid-power companion for the Fujifilm X-cameras. Not as powerful as, say a Godox V850, but also a lot smaller and lighter.

The i40 fits the 'functional retro' style of theX cameras really well. I love the old-school dial on the back that quickly lets met adjust Flash Exposure compensation or manual power.

The i40 fits the 'functional retro' style of theX cameras really well. I love the old-school dial on the back that quickly lets met adjust Flash Exposure compensation or manual power.

I use a number of flashes on my Fuji cameras. When I want something unobtrisive and lightweight, I reach for the i40. I love its manual dials: they let you quickly switch from manual mode to TTL mode and adjust flash exposure compensation without diving in to the camera menu. Especially in combination with the X100T (and when shooting at its 1/2000th sync speed) this little flash can even overpower the sun.

Price: $269 in the US (B&H link) | GBP 140,49 (Amazon UK link) | only 189€ at this retailer in Belgium.

Kids playing. All I had with me were the X-100T, the Lastolite Trifold and the Nissin i40.

Kids playing. All I had with me were the X-100T, the Lastolite Trifold and the Nissin i40.


8. A backpack to stow it all away: the F-Stop Loka UL.

The Loka UL is the perfect lightweight backpack for a lightweight mirrorless system like Fujifilm's. I especially prefer it to a shoulder bag when I know I'll have to hike a lot. Image © Serge Van Cauwenbergh | www.fotografieblog.be 

The Loka UL is the perfect lightweight backpack for a lightweight mirrorless system like Fujifilm's. I especially prefer it to a shoulder bag when I know I'll have to hike a lot. Image © Serge Van Cauwenbergh | www.fotografieblog.be 

I really like the concept of an outer shell, in which you put an ICU of your choice, depending on the job or the hike (and gear requirements) at hand. There are straps on the side to fit a travel-sized tripod or a small light stand such as the Manfr…

I really like the concept of an outer shell, in which you put an ICU of your choice, depending on the job or the hike (and gear requirements) at hand. There are straps on the side to fit a travel-sized tripod or a small light stand such as the Manfrotto Nano.

I've never been much of a backpack user until I discovered the F-Stop Loka UL. UL stands for Ultralight and with a base weight of around 1 kg, that is exactly what this backpack promises. I say 'base weight' because there's also the weight of the modular camera insert. F-Stop calls these these ICUs or Internal Camera Units. Depending on their size, these add about half a kilo to the bag's weight. The idea is that you can use a bigger ICU (possibly even with a laptop sleeve to carry your gear to a destination and switch that out for a smaller one to carry parts of your gear around while in that destination. The smaller the ICU, the more room you have for other items, such as a jacket, a fleece or other hiking essentials.

As far as I can tell, the F-Stop Loka UL only has one disadvantage, and that is that it's often out of stock!

Not all ICU's fit in all F-Stop backpacks. This is the compatibility table for the Loka UL.

Not all ICU's fit in all F-Stop backpacks. This is the compatibility table for the Loka UL.

Price: $199.95 for the bag, $50 to $89 for the ICU, depending on size. Benelux importer is Disnet.nl. In the Netherlands, Cameranu.nl has the bag in stock at the moment of writing this.


9. Roboshoot X-triggers: Wireless TTL Flash Freedom for your Fuji cameras

The MX-20 is the trigger

The MX-20 is the trigger

The RX-20 is the receiver

The RX-20 is the receiver

Ok, I'll admit it, I'm a bit of a flash photography geek (which you'll no doubt see reflected in this gift guide) but I did not want to leave this one out: it's probably the newest and most hi-tech of all of the gift suggestions in this post. In fact, it's so new it might not be out yet by Christmas but you can always give your loved ones a self-made voucher. These triggers are the first that let you wirelessly, remotely trigger a Fuji flash in TTL from your camera. Yes, you read that right. Wireless TTL support! And what's even better, it also works with selected Nikon flashes like the SB900 and the SB910. So, if you've just moved from Nikon to Fuji and you have a couple of those lying around, you can trigger them in TTL from your Fuji. I've been testing a beta version of this system (I recommend the MX-20 and RX-20) and it works as advertised. The system supports up to 4 different groups, the manual power or TTL Ev compensation of which you can set from a smartphone App.

This image was shot with the Fuji X100T and a wide-angle conversion lens (which also makes a great gift for any X100 user, by the way! An MX-20 trigger on the camera and a Nikon SB-900 attachad to an RX-20 receiver.

This image was shot with the Fuji X100T and a wide-angle conversion lens (which also makes a great gift for any X100 user, by the way! An MX-20 trigger on the camera and a Nikon SB-900 attachad to an RX-20 receiver.

Price: The triggers are currently available for pre-order at a price of $299 for an MX-20 + RX-20 set. In the Benelux, these triggers will be distributed through VDH Photo. Please contact them with your questions re: availability and estimated price.


10. North India Fuji X Photo Workshop

Ok, this is the sort of gift you give to people you really, really love, such as... yourself :-) All the gear in the world does not mean anything without you putting it to use. And what better way to do so than with like-minded people in one of the best countries to photograph in the world: India. After successful workshops in Rajasthan and the Indian Himalayas, fellow Fuji X Photographer Matt Brandon and I have teamed up again for a fantastic 10 day photo workshop in India.

Who said 'If your pictures aren't good enough, you're not close enough?' Shot with the XF 14mm prime.

Who said 'If your pictures aren't good enough, you're not close enough?' Shot with the XF 14mm prime.

From February 14th to February 24th, we'll roam the small alleyways of Delhi's fascinating Chandi Chowk district (where the cover image of my Black and White preset bundle was shot), we'll explore the majestic Taj Mahal and finally, we'll spend 5 days in what seems to be the most photogenic city in India, maybe in the whole world: Varanasi. With two seasoned travel photographers, who know their way around the Fujifilm X-system as your guides, you're bound to learn a tonne. Matt focuses on storytelling and composition and I will be teaching you all about off-camera flash and postprocessing images. Workshops like this might be more expensive than your average package bus tour with selfie-snapping tourists, but they'll leave you with an impression and a portfolio that will last long beyond next year's Holdiay Gift Guide!

Below are some typical shots from similar workshops Matt and I ran.

Price and details: check Matt's info page on the North India, Delhi, Agra and Varanasi Workshop.

Review: Western Digital WD My Passport Pro for Mac. The ultimate portable harddrive for photographers?

Ever since I saw my buddy Matt Brandon from www.thedigitaltrekker.com use one on our Rajasthan photo workshop, I've been using a Western Digital WD My Passport Pro myself. The difference being that I opted for the 2 TB version. After over a year of using the drive, it's time for a review. Is it the ultimate hard drive for photographers? Well, although there's no such thing as perfection, it does come close!

What is it?

The WD My Passport Pro is an external hard drive specifically for Mac users: it uses a fast Thunderbolt connection. The drive draws it power from your computer, so no need to lug a power adapter along. Some may disagree, but I find the fact that the cable is attached a nice feature: when not in use, it wraps around the side of the drive. So, for someone as disorganised as me, it's a good thing I cannot loose the cable anymore. Unless I loose the entire drive, obviously...

Inside though is where things really start to get interesting: the WD My Passport Pro does not contain one but two classical rotating 2.5 inch 5400 RPM drives. Two 1 TB drives in the case of the My Passport Pro 2 TB and two 2 TB drives In the case of the bulkier 4 TB version. Speaking about size, here's how the two models differ:

Images courtesy WD

Images courtesy WD

What makes it special: three ways to configure it:

 
The WD Utilities software lets you set up the drive in three different ways. 'Mirror' is the one that I use and that offers the protection your images deserve.

The WD Utilities software lets you set up the drive in three different ways. 'Mirror' is the one that I use and that offers the protection your images deserve.


Using the supplied and easy to use WD software, this means you can set up the drive in any of three ways:

  1. JBOD (Just a Bunch of Disks): this means that the two drives inside the My Passport Pro will also show as two separate drives on your Mac. It's a bit like using two separate external drives, the difference being that they're conveniently stored in the same housing and there's only one cable. However, this is not the use I make of it nor is it the use I recommend making: there's cheaper and more efficient options for that, such as the newly announced My Passport Ultra, which exists in up to 3 TB of storage. 
    UPDATE: check out my friend Mike's workflow in the comments section: he does use the drive in JBOD mode and makes some valid arguments for that, too. And... he works in IT so he knows way more about this stuff than I do!
  2. Raid 0: this means that the two drives act like one big 2 or 4 TB drive (depending on the model). Especially for the latter, that's a lot of mobile storage! The risk however is that if one drive fails, all your data is gone because it's effectively spread across the two drives. So, unless you have an airtight backup system (which would mean you would have to backup to another WD My Passport Pro or a similar capacity drive) and, if you don't want to interrupt your workflow, also carry that backup with you, this is probably not the way you want to store your precious photographs.
  3. Which brings us to the third option (the one I use and is most recommended for photographers who, unlike Mike, aren't IT experts :-) : use the drive in Raid 1 mode. This means that the drive behaves as a 1 or 2 TB drive on your system and whatever you save on that drive is automatically mirrored on the second drive. If drive one fails, your data is still intact on the other and vice versa. As Mike rightly points out in the comments, this only protects you from drive failure, though. If you accidentally delete a file from one drive, it's automatically gone from the second, too... 

It's the latter option which makes the drive interesting for photographers who generally are paranoid (or should be) about losing their precious images. 

Scenario 1: using the drive as a temporary drive while traveling

I see two big scenarios in which this drive really shines: the first is as a travel drive to store your photographs (and other essential data) on while you're traveling. This means the setup would look something like this:

WDLaptop2.jpg

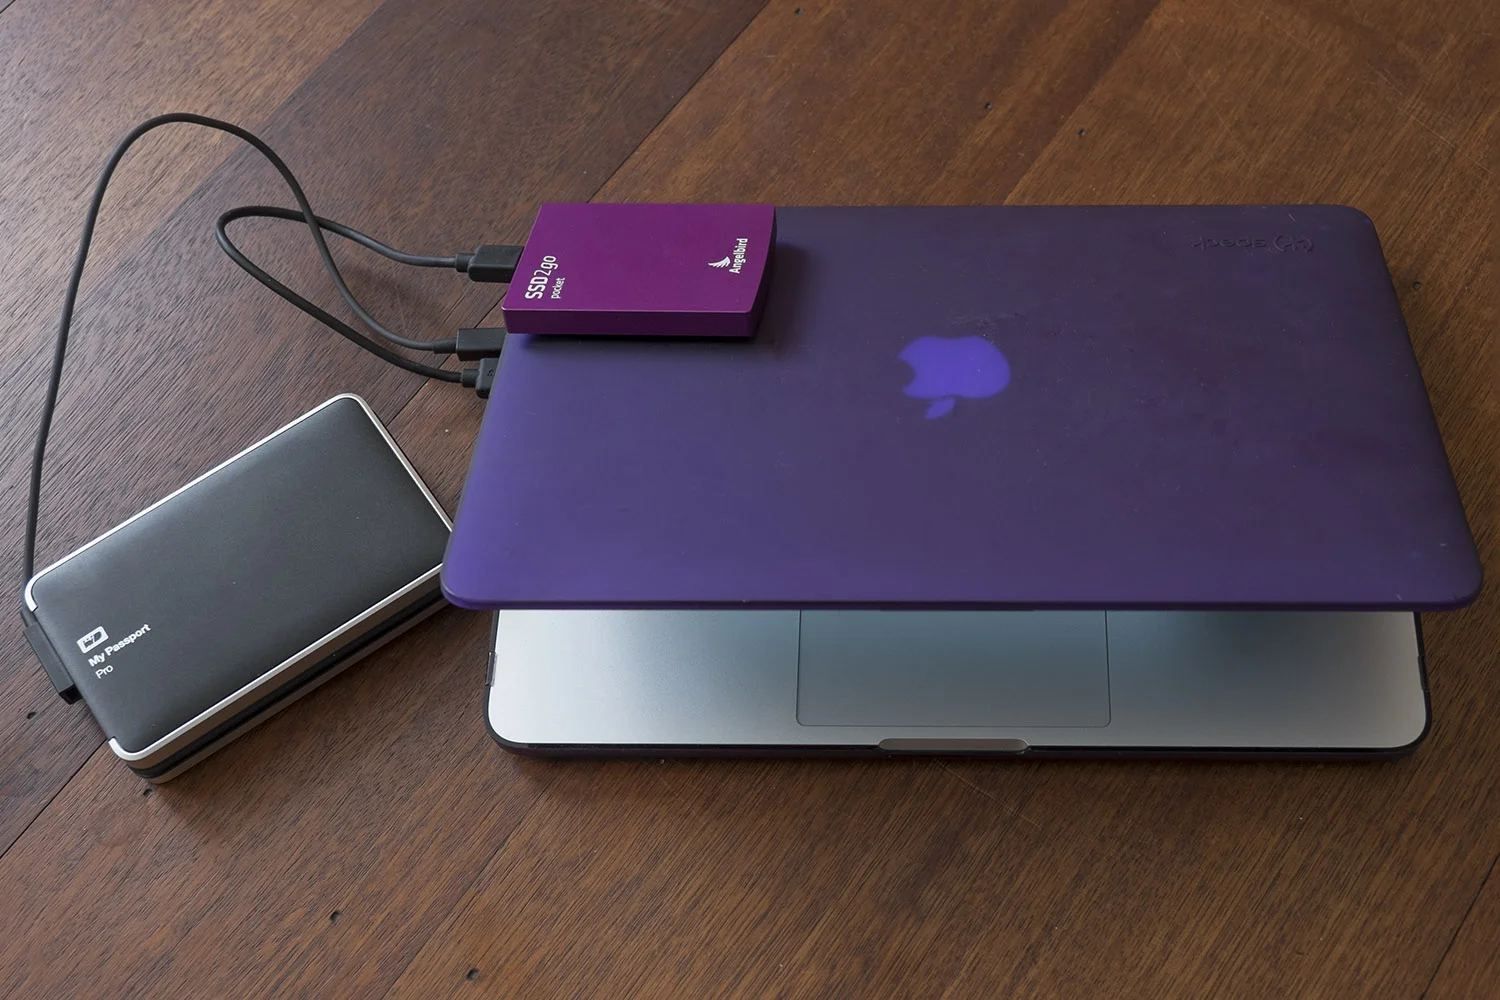
This is the scenario I follow when I'm traveling: using Lightroom, I'll import my images from the SD card to the My Passport Pro. My Catalog and Previews are on an external 512 GB Angelbird SSD drive. When Lightroom prompts me to back up the catalog when I quit it, I altnernate that backup between the internal drive of my laptop and the WD My Passport Pro. This adds an extra layer of security for my Catalog, as I will always have a fairly recent version in at least two extra locations. I only backup the catalog itself, by the way, not the previews, as they are too bulky and can always be re-rendered if necessary. 

If your Lightroom Catalog is not as big as mine (I have over 130.000 images in it), you could also put the Catalog, Previews and Smart Previews on the internal drive of your laptop or... on the My Passport Pro as well. Lightroom will just run slower because of the slower read and write speeds of this type of drive compared to solid state memory. Ultimately, you're the only judge of whether 'slower' still means 'fast enough' or 'too slow'. 

Especially if you're using a MacBook Air for traveling, due to its limited internal hard drive space, I'd recommend against putting the catalog and previews on the internal drive.

Additional security precautions while traveling

Having my images and a backup of my Lightroom catalog on the My Passport Pro protects me against drive failure, but it does not protect me against theft or loss of the drive, obviously. That's why I never reformat my memory cards while I'm traveling: memory cards are cheap so I just bring plenty of them. By not reformatting them, I have an extra, super light backup which I can easily take with me. I also make it a habit never to leave the My Passport Pro and my laptop unattended together (like in the hotel room): I will always carry one of them with me. That's also an advantage of the 2 TB version over the 4 TB version: it's slightly lighter and quite a lot smaller.

If the internet is fast enough wherever I'm traveling, I'll try to upload my best pictures of the trip (say the 5 star ones) to Dropbox as yet an extra layer of security.

When I'm back home, I will connect my catalog drive and the WD My Passport Pro to my desktop computer and - using Lightroom ! -I will  transfer the files over to my main storage system (currently a Drobo 5D Thunderbolt, although I have been investigating the options of NAS storage), freeing up room on the My Passport Pro for the next trip.

Scenario 2: using the drive as your only dedicated photo drive

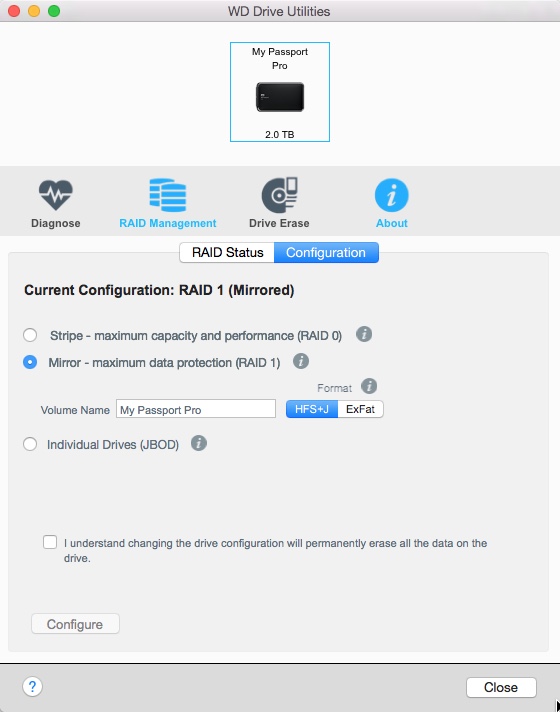
For this workflow, I would recommend the 4 TB version because... you never can have enough storage, right? In this case, you just use the My Passport Pro as a convenient, small Raid device with the added benefit that should you ever want to take it with you, it's small and light enough to do so. 

This gives you 2 TB of mirrored hard drive space. In the case of my Fujifilm Raw files, which weigh about 30 MB per image, this means I could safely store some 66.000 images on the 4 TB version. That's a lot of images! If you're planning on organizing and storing more images than that, you're probably better of using a bigger, heavier (and more expensive) Raid System or NAS system. 

UPDATE: SCENARIO 3 - See Mike's comment for a possible third scenario I hadn't thought of myself.

Pricing

As you might expect from the feature list: these drives aren't cheap. If you're more of the DIY variety, you could get two separate drives and use separate backup software to do something similar. Personally, I prefer to avoid hassling with too much gear and software so I prefer to pay a premium for the portability and the convenience of the WD My Passport Pro. The 2 TB version will set you back some 289 € (that's at Dutch online retailer Bol.com) while the 4 TB version - if you're lucky enough to find a dealer that has them in stock - retails for about 432 €. As often is the case, it pays to surf around a bit and also, if you're reading this from the US, consider yourself lucky as prices are cheaper there.

The verdict

If you're a photographer using a Mac, the My Passport Pro is a very convenient tool to add an extra layer of security in your photography workflow, whether you're on the go or in your studio. The 2 TB version is very compact for its features and although not exactly shirt-pocketable, even the 4 TB version is still easily transportable. I've been using the 2 TB version for over a year now and other than one of the rubber feet getting MIA, which I replaced by a bit of Sugru, it has performed flawlessly! 

Highly recommended!

The WD My Passport Wireless is another drive that can be of interest to photographers, as it features a built-in SD Card Reader

The WD My Passport Wireless is another drive that can be of interest to photographers, as it features a built-in SD Card Reader

By the way, if you're mainly needing an external drive to back-up travel images to, Western Digital has given itself some internal competition in the form of the My Passport Wireless, which I will review on this blog shortly. Suffice to say for now that the built-in SD card reader of this particular drive should be enough to draw a photographer's attention.